 Skip to content
Mastering the Art of Sew-In Hair Extensions: My Personal Odysseys
Sew-in hair extensions1, where art meets meticulous handwork on your very own head, start by creating a solid foundation — be it braided or beaded — upon your natural hair. This foundation is akin to the pillars of a majestic edifice, supporting the extension wefts that grace your look. With a curved needle2 and robust thread, these wefts are sewn onto the base using a sequence of stitches — commencing often with "whip stitches3" and graduated securing with a resolute "blanket stitch4," endowing a harmonious and natural outcome. We are delving into the allure of sew-in extensions, a journey I have personally navigated, culminating in perfection and an appreciation for this beautiful marriage of technique and aesthetics.
How Are Hair Extensions Sewn In?
Diving into the artistry of sew-ins is like waltzing into a grand ballroom, where every step must be placed just so to captivate the audience — or, in this case, achieve a natural, flowing appearance.
Dive Deeper
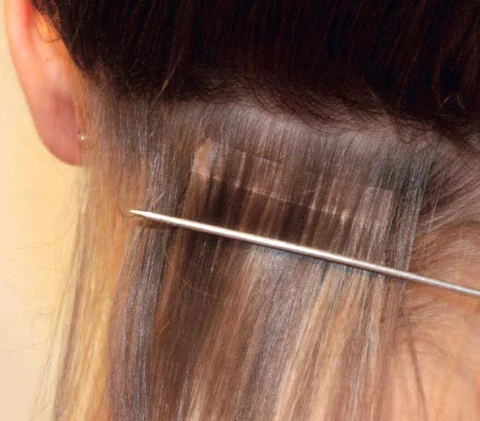
Having ventured into this sphere numerous times — both professionally and personally — I can attest that it all begins with the creation of a braided base5, much like laying out a canvas for a painter. Whether using a neat row of cornrows or a sophisticated beading technique, establishing this foundation is crucial for a seamless integration6.
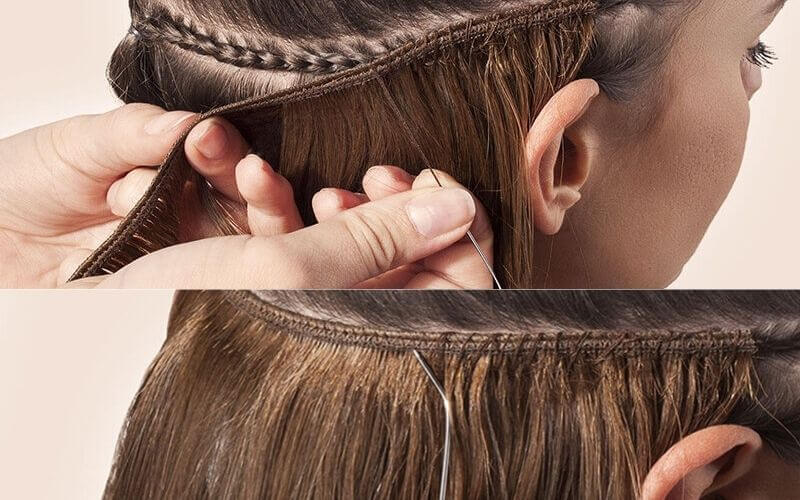
In my salon escapades back in 2018, we meticulously curated these bases, utilizing curved needle2s akin to those used in upholstery — a metaphorical sewing machine brought to life by hand. The focus was not just on attaching hair, but on creating a breathable, natural blend7. The whip stitch offered initial attachment strength, while the subsequent blanket stitch4 locked in longevity and aesthetics.
Imagine the wefts as an orchestra section, each playing its part to create a symphony. Placement is critical — starting from the nape upwards ensures volume and natural flow. The joy of beholdin' a completed sew-in is akin to an artist's first glimpse of their masterpiece, an unparalleled joy.
Can I Sew-In My Own Hair Extensions?
Venturing into a sew-in on your own, as a solitary sailor on an open sea, is a daunting yet deeply rewarding endeavor.
Dive Deeper
During my early days as a budding enthusiast, I embarked on this solo expedition, armed with YouTube tutorials and experimental zest. What I found was a riveting array of trial and error — a journey from haphazard stitches to refined techniques, each adding a unique tale to my portfolio.
Here's a roadmap for those brave enough to solo this path:
- Tools at the Ready: Assemble a curved needle2, sturdy thread, and your chosen wefts.
- Mirror, Mirror: A dual-mirror setup can be your guiding compass in this expedition, allowing you to navigate uncharted territory — the back of your head.
- Step-by-Step: Begin your braid or bead foundation carefully and ensure each stitch is secured with attention to tension — not too tight, but firm.

Reflecting on these solo ventures, I found it analogous to learning to paint — control comes with practice, and beauty emerges from patience and invention.
Comparison Table: DIY vs. Professional Sew-In
| Aspect | DIY Sew-In | Professional Sew-In |
|---|---|---|
| Cost | Lower | Higher |
| Skill Requirement | High | Medium |
| Time Invested | Longer | Shorter |
| Customization | Limited by skill | Highly customizable |
How Long Do Sew-In Hair Extensions Last?
Sew-in hair extensions1, akin to a cherished painting, require care and appreciation for their beauty to endure.
Dive Deeper
Typically, a well-maintained sew-in can last anywhere from six to eight weeks. My own trial and triumph unveiled that longevity depends not merely on the initial craft but on continuous care — akin to tending a bonsai that grows more profound with each gentle prune.
Here’s an insider’s guide to prolonging their lifespan:
- Wash Wisdom: Avoid overwashing, as it strips them of essential oils. A weekly wash suffices.
- Checkpoints: Regular maintenance checks are more than mere upkeep — they're a dialogue between your hair and your extensions, ensuring ongoing harmony.
- Gentle Touch: Using a silk pillowcase8 can reduce friction as you sleep, akin to an art conservator's touch in preserving vintage masterpieces.
Do Sew-In Hair Extensions Hurt?
Upon embarking on a new sew-in, discomfort — much like breaking in new shoes — is a common question that echoes in many new wearers' minds.
Dive Deeper
In my narrative tapestry woven with extensions, initial tightness has often been a trade for long-term pleasure — a gentle tension that eases within a few days of wear.
- Personal Prelude: The initial sensation, as the hair adjusts, can evoke memories of the heartbeat beneath a new tattoo — palpable yet rewarding.
- Professional Prudence: If discomfort transcends to pain, it signals a need for remedial measures. Dialogue with your stylist is key, ensuring adjustments are made timely.
An expert tip — indulging in a soothing scalp massage9 post-installation can transform the experience from a daunting ordeal to a newfound appreciation of beauty.
Conclusion
Stepping into the realm of sew-in hair extensions embodies not just an aesthetic transformation, but a journey of intricate skill and personal fulfillment. As I've shared my voyage from a novice to an adept in this enchanting domain, I urge you to embrace this artistry, immerse in its elegance, and command the symphony of your appearance.
Choosing your hair extensions with brands like Plucharm Hair ensures a harmonious blend of quality and innovation, echoing our motto at Plucharm: "Create The Best Hair To Global Beautiful Women."
Whether your venture is forged in the camaraderie of a salon or nurtured in solitary pursuit, remember — your sew-in installation story is a unique portrait, painted with confidence and flair.
-
Explore the advantages of sew-in hair extensions to understand why they are a popular choice for many. ↩ ↩
-
Discover how a curved needle enhances the sew-in process and contributes to a natural look. ↩ ↩ ↩
-
Understand the role of whip stitches in securing hair extensions for durability and style. ↩
-
Find out how blanket stitches provide strength and longevity to your sew-in extensions. ↩ ↩
-
Learn the best techniques for creating a strong braided base, essential for a successful sew-in. ↩
-
Learn about the techniques that ensure your extensions blend perfectly with your natural hair. ↩
-
Explore tips for ensuring your sew-in extensions blend seamlessly with your natural hair. ↩
-
Learn how a silk pillowcase can help maintain the quality and longevity of your sew-in extensions. ↩
-
Find out how a scalp massage can enhance comfort and promote healthy hair after installation. ↩

